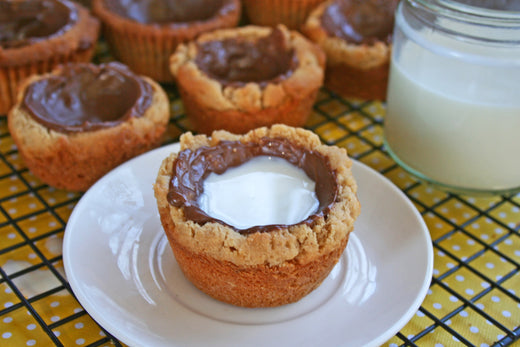
Peanut Butter Cookie Milk Cups
- Yield:18 cookie cups
- Prep Time:40 minutes
- Cook Time:15 minutes
- Total Time:55 minutes
Ingredients
For the cookie cups:
2 1/2 cups all-purpose flour
1 tsp salt
1 cup (2 sticks) unsalted butter, softened
1 cup Peanut Butter & Co. Smooth Operator
1 cup granulated sugar
1 cup light brown sugar, packed
2 large eggs, room temperature
For the filling:
5 ounces milk or dark chocolate, coarsely chopped
For the serving:
Milk or plant milk
Directions
In a large bowl, sift together the flour and salt. Set to the side.
In a stand mixer fitted with the paddle attachment, cream the butter and Peanut Butter & Co. Smooth Operator until silky in texture and totally combined, about 1-2 minutes on high speed.
Pause to add the two types of sugar, and mix briefly on low speed and then as the sugar is absorbed, increase the speed to high, mixing until the butter and sugar mixture is fluffy and light. Pause to scrape down the sides of the bowl as needed.
Add the eggs, one at a time, mixing briefly to incorporate each one into the mixture. Add the flour mixture to the dough, and mix until incorporated.
Scoop 1/4 cup of dough into each cupcake liner or prepped portion of the tin.
Bake for 12-15 minutes, or until golden on top. Remove from the oven and transfer to wire racks. They will look like cupcakes
Let cool for about a minute, and then grab a spoon and do something that feels very strange: press the centers of each cupcake-looking portion in, forming a well in the center. Be careful; the cookies are still hot, but it’s important to do this while they are still soft. If you did not use cupcake liners, also run a sharp knife along the edge of each cookie cup to loosen it from the sides
Let the cups cool completely. Once cooled, either invert the pan to remove the cups (if unlined), or remove the cups and remove the liners.
When the cookie cups are cooled, melt the chocolate in the top of a double boiler. Once melted and liquid, remove from heat.
Grab one of your cookie cups. Using a spoon (not a teaspoon measure, but a regular spoon), scoop a small amount of chocolate into the cup, and use the back of the spoon to coat the inside of the “cup” with chocolate. Make sure it’s completely “sealed” with no cookie showing through: this is what makes the cups “airtight” enough to hold milk for a short time.
Repeat with the remaining cups, and then leave them to sit until the chocolate has completely “set”. You can hasten the process by putting them in the refrigerator.
To serve, pour a small amount of milk in the cup before serving. Note that these cups won’t hold milk infinitely, so hold back on this step until directly before serving each cup.
To eat, first, drink the milk, and then eat the cup it came from!
Cook Notes
As you’ll see in step 1, you can either line your tins with cupcake liners or simply grease them. The advantage of using cupcake liners is that it makes for easier removal; the advantage of not using cupcake liners is that you have smooth sides on your “cups”. It’s up to you! The flavor outcome is the same.
Tags: Bake Yourself Happy Chocolate Cookies Dessert Holiday Peanut Butter & Co. Seasonal Smooth Operator